You’ve invested in beautiful landscaping — mature trees, thoughtfully designed plantings, maybe a water feature or patio space. During the day, your yard looks magazine-worthy. But once the sun sets around 7pm, it all disappears into darkness. Your outdoor space becomes completely unusable right when you’d actually have time to enjoy it after work.
You’ve tried those solar stake lights from the hardware store. They cast uneven light, die by 9pm, and honestly make your professionally landscaped yard look like a Halloween display. Or maybe you have harsh spotlights that were installed when the house was built — functional, sure, but they turn your yard into a security zone, not a relaxing retreat where you’d want to spend an evening.
Professional landscape lighting design changes everything. It’s not about flooding your yard with light — it’s about layering ambient, task, and accent lighting to extend your outdoor living space well into the evening. Done right, landscape lighting transforms how you use your property and adds a whole new dimension to your investment in landscaping.
Here’s how landscape lighting design actually works in Maryland, and what makes the difference between builder-grade spotlights and a system designed to highlight your property’s best features.
What Is Landscape Lighting Design? (And Why It’s Different From Just Adding Lights)
Landscape lighting design is the intentional planning of outdoor lighting to create layers of illumination — highlighting specific trees, defining pathways, casting soft ambient light, and making architectural features visible after dark. It’s the difference between throwing light at your yard versus designing how light interacts with your existing landscape.
Most people think “outdoor lighting” means buying fixtures and sticking them in the ground. That’s installation. Design is completely different.
Design means understanding where light should go, where shadows should stay, and how different types of lighting work together. It means knowing that uplighting a 30-year-old oak from six feet away creates a completely different effect than placing the same fixture two feet from the trunk. It means recognizing that your water feature needs cross-lighting to catch the shimmer of moving water, not a spotlight aimed straight down.
Here’s what makes landscape lighting design different:
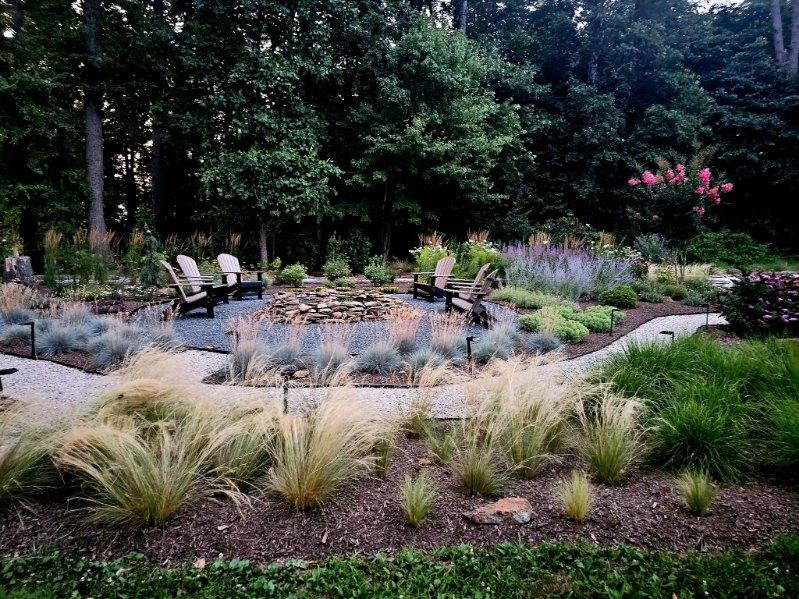
The three layers work together. You need ambient lighting for overall mood (think soft illumination across a patio or seating area). You need task lighting for safety and function (pathway lights that show you where to walk without blinding you). And you need accent lighting to highlight focal points like specimen trees, water features, or architectural details.
Missing any one of these layers leaves your outdoor space feeling unbalanced. Too much task lighting and your yard feels like a parking lot. Only accent lighting and you can’t see where you’re walking. Just ambient lighting and nothing stands out — it’s flat and boring.
The placement, fixture type, and beam angle matter way more than wattage. A 3-watt LED fixture placed correctly will outperform a 20-watt flood aimed randomly. Professional-grade fixtures let you control exactly where light goes — narrow spots for uplighting trees, wide floods for washing walls, directional path lights that illuminate the ground without glare.
And here’s something most homeowners never think about: shadows create depth and drama. When we design lighting, we’re not trying to eliminate darkness — we’re using darkness strategically. The contrast between light and shadow is what makes your landscape interesting after dark. A tree with one side lit and the other in shadow looks three-dimensional and dramatic. That same tree flooded with light from all sides looks flat.
Because Oakfield designs water features, plants specimen trees, and installs landscape lighting as a unified system, we’re thinking about evening lighting from day one — not trying to retrofit fixtures into established gardens years later.
The Three Layers of Professional Landscape Lighting
Every effective landscape lighting system combines three layers: ambient lighting for overall mood, task lighting for safety and function, and accent lighting to highlight focal points. Missing any layer leaves your outdoor space feeling unbalanced or incomplete.
Let me break down how each layer works and why you need all three.
Ambient Lighting — Setting the Evening Mood
Ambient lighting creates gentle, general illumination across your outdoor space. It’s not bright — it’s the soft glow that makes a patio or seating area feel inviting after dark.
Think downlighting from trees or pergolas, low-level wash lights along garden edges, or subtle illumination that defines the perimeter of your outdoor room. The goal isn’t to see perfectly — it’s to create a comfortable, relaxed atmosphere where you’d actually want to spend time.
In Maryland, this matters during those perfect spring and fall evenings when temperatures hit the 60s and 70s. Ambient lighting turns your backyard into a space you can use for dinner, conversation, or just unwinding with a glass of wine after work.
Task Lighting — Safe, Functional Pathways
Task lighting keeps you safe. It lights walkways, steps, grade changes, and transitions between different areas of your property.
Good task lighting illuminates the ground — not your eyes. Path lights should be placed low and aimed down. Step lights should show you exactly where each step is without blinding you as you walk. Downlighting along a walkway should create pools of light that guide you without glare.
I can’t tell you how many properties I’ve seen with path lights aimed straight out instead of down. You end up squinting the whole way to your front door. Task lighting should be so well-designed that you barely notice it — you just feel safe and oriented.
Accent Lighting — Highlighting Your Best Features
Accent lighting is where landscape lighting gets interesting. This is the layer that showcases your property’s best features after dark.
Uplighting on specimen trees — Japanese maples, dogwoods, mature oaks — creates dramatic focal points. The light travels up the trunk and illuminates the canopy and branching structure. Textured bark (like oaks or river birch) looks stunning when lit from below.
Cross-lighting on water features makes moving water shimmer and catch light. You place fixtures to one or both sides of a waterfall or stream so the water reflects and refracts the light as it moves. It’s magic.
Grazing architectural elements — stone columns, textured walls, natural rock features — adds depth and dimension. The light skims across the surface at a low angle, highlighting every texture and detail.
Accent lighting creates focal points and draws your eye through the space. It tells you what’s important and worth looking at.
Here’s the Oakfield advantage: Because we design water features, install trees, and create the plantings, we know exactly what deserves to be accented. We’re not walking onto someone else’s property trying to figure out what to light — we built the features we’re lighting. That integration makes all the difference.
How to Design Landscape Lighting That Actually Enhances Your Property
Great landscape lighting design starts with understanding what you already have — mature trees, garden beds, water features, architectural details — and then deciding what deserves to be seen after dark. Here’s the actual process.
Step 1: Identify Your Focal Points
Walk your property at dusk and ask yourself: what’s worth highlighting? What do you want to see when you look out your kitchen window after dinner? What should visitors notice when they pull into your driveway?
Common focal points include mature specimen trees (especially ones with interesting branching or bark texture), water features (ponds, waterfalls, streams), entry areas (front walkway, front door, columns), and outdoor seating or entertaining spaces.
Not everything deserves equal attention. In fact, trying to light everything equally creates visual clutter with no sense of hierarchy. Pick your best features and let the rest fade into softer ambient light.
Step 2: Layer Your Lighting
Once you know your focal points, design the three layers:
- Accent lighting on those focal points (uplit trees, cross-lit water, grazing stone walls)
- Ambient lighting for seating areas, patios, general mood
- Task lighting for pathways, steps, transitions between spaces
Each layer uses different fixture types and placement strategies. Accent fixtures are directional and focused. Ambient fixtures cast broader, softer light. Task fixtures are low and aimed at the ground.
Step 3: Consider Your Sightlines
Where will you actually view this lighting from? Inside the house looking out? From the street as you pull up? Sitting on your back patio?
This matters more than people realize. A tree that looks great lit from your living room window might be completely invisible from your driveway. A pathway that’s well-lit from the front might create harsh glare when viewed from your porch.
Design lighting for the views that matter most to you. If you spend every evening looking out your kitchen window at the backyard, that’s your primary sightline. Design for that view first.
Step 4: Use Fixtures That Disappear During the Day
Professional landscape lighting fixtures are designed to blend into the landscape when they’re not in use. They’re hidden in planting beds, tucked behind natural features, or finished in materials (brass, copper, bronze) that age gracefully and look intentional.
Big, obvious fixtures ruin your daytime aesthetics. If your yard looks cluttered with visible light fixtures during the day, the lighting design has failed.
Step 5: Plan for Future Growth
Trees grow. Plantings mature and fill in. Your landscape will look different in three years than it does today.
Professional lighting design accounts for this. We adjust fixture angles as trees grow. We anticipate where plantings will spread. We design systems that can be tweaked and adjusted over time without ripping everything out and starting over.
Maryland-Specific Considerations for Landscape Lighting Design
In Maryland, we deal with seasonal changes that Arizona and Florida don’t have to think about. Your deciduous trees go bare in November and don’t leaf out again until April. That’s five months of completely different structure and appearance.
Design your lighting to work year-round. An oak tree that’s stunning when lit in summer — with a full canopy and layers of leaves catching light — should also look good in winter when it’s a dramatic silhouette of bare branches against the night sky. That’s actually when uplighting on deciduous trees really shines. The branching structure becomes sculptural and architectural.
Evergreens (hollies, magnolias, arborvitae) provide consistent visual interest all year. If you want focal points that look the same in January and July, incorporate evergreens into your lighting design.
Weather durability matters here. Maryland summers are humid. Winters cycle between freezing and thawing. Spring can be wet for weeks at a time.
Your fixtures need to handle all of that without corroding, rusting, or failing. That means brass, copper, or stainless steel fixtures — not cheap aluminum or plastic that’ll degrade in five years. It means proper drainage so water doesn’t pool inside fixtures and freeze. It means burial-depth wiring (6–8 inches underground) so freeze/thaw cycles don’t expose or damage connections.
Native trees and plantings light differently. Oaks, maples, dogwoods, and redbuds each have unique bark texture and branch structure. Uplighting works beautifully on the deeply textured bark of mature oaks. Dogwoods have elegant horizontal branching that creates layers when lit. Japanese maples (common in Maryland landscapes) have delicate, intricate branch patterns that look stunning backlit or uplit.
Ornamental grasses catch light differently than boxwoods. Perennial gardens create texture and movement that evergreen shrubs don’t. Professional lighting design accounts for these differences.
Evening outdoor use patterns shift with the seasons. In summer, it doesn’t get dark until 8:30pm or later — your lighting doesn’t even kick in until late evening. But in spring and fall, when outdoor temperatures are perfect for entertaining (60s and 70s), sunset comes much earlier. Those are the seasons when landscape lighting makes the biggest difference. It extends your outdoor season by 6–8 weeks on either end.
Common Landscape Lighting Mistakes Homeowners Make (And How to Avoid Them)
DIY landscape lighting usually fails because homeowners focus on fixtures instead of design. They buy a box of path lights at the hardware store, space them evenly along the walkway, and wonder why it looks terrible. Here are the mistakes I see most often.
Mistake 1: Too Much Light (The Stadium Effect)
More light is not better. Overlighting makes your yard feel harsh, commercial, and uncomfortable. You end up with what I call the “stadium effect” — bright, flat, shadowless illumination that eliminates any sense of mood or atmosphere.
The fix: Use lower lumens (brightness) and create contrast with shadow. Let some areas fade into darkness. The interplay between light and shadow is what makes landscape lighting interesting.
A well-designed system uses 30–40% less total light output than most homeowners expect — but it looks dramatically better because the light is placed strategically, not scattered everywhere.
Mistake 2: Lighting Everything Equally
If you try to light every tree, every garden bed, every corner of your property with equal intensity, you create visual clutter with no focal points. Your eye doesn’t know where to look.
The fix: Accent your best features and let other areas fade into softer ambient light. Create hierarchy. Three beautifully lit focal points will always beat ten equally lit features competing for attention.
Mistake 3: Fixtures That Stick Out Like Sore Thumbs
I’ve seen properties where the landscape lighting fixtures are more visible during the day than the actual landscape. Big, chunky, obviously modern fixtures scattered across garden beds.
The fix: Use integrated fixtures that hide in plantings, tuck behind natural features, or are finished in materials (aged brass, copper, bronze) that look intentional and blend with hardscape. During the day, your fixtures should be nearly invisible.
Mistake 4: Wrong Fixture Placement
Uplighting a tree from two feet away creates a completely different (and usually worse) effect than placing the same fixture six feet from the trunk. Beam angles matter. Narrow spots versus wide floods create entirely different looks.
The fix: Professional spacing, angles, and fixture selection based on what you’re lighting. Trees need fixtures placed 6–8 feet from the trunk, aimed upward at 30–45 degrees. Pathways need low fixtures aimed down, spaced 8–10 feet apart. Water features need cross-lighting from the side, not top-down spots.
This is where professional design pays for itself. We know these placement rules because we’ve installed hundreds of systems. Trial and error on your own property gets expensive fast.
Mistake 5: Solar or Low-Quality LED Systems
Solar lights are tempting because they’re cheap and don’t require wiring. But they fade by 9pm, provide inconsistent brightness (depending on how sunny the day was), and look cheap because they are cheap.
Low-quality LEDs from big-box stores have harsh color temperatures — that blue-white light that looks like a gas station instead of the warm, inviting glow you want in a residential landscape.
The fix: Professional-grade LED systems with transformers, consistent warm white color temperature (2700K–3000K), and fixtures designed to last 15+ years. The upfront cost is higher, but the performance and longevity make it the only option worth installing.
LED Landscape Lighting: Why It’s the Only Option Worth Installing
LED technology has made landscape lighting more energy-efficient, longer-lasting, and better-looking. If you’re installing landscape lighting in 2025, there’s no reason to use anything else. Halogen and incandescent systems are obsolete.
Here’s why LED wins in every category:
Energy efficiency: LEDs use about 75% less energy than halogen bulbs. A typical landscape lighting system that would cost $40–50/month to run with halogen costs $10–12/month with LEDs. Over a 10-year lifespan, that’s $4,000–5,000 in savings.
Longevity: Professional LED fixtures last 30,000–50,000 hours. That’s 10–15 years of nightly use (5 hours per night, 365 days per year). Compare that to halogen bulbs that burn out every 2–3 years and need constant replacement.
Better color quality: Warm white LEDs (2700K–3000K) mimic the soft, inviting glow of incandescent bulbs without the heat or energy waste. Cheap LEDs give you that harsh blue-white color, but professional-grade LEDs are indistinguishable from traditional warm lighting.
Dimming capability: LEDs can be easily dimmed to adjust brightness for different moods and uses. Want brighter light for a backyard party? Dim it down for a quiet evening? LEDs handle it. Halogen systems dim poorly (color temperature shifts as you dim).
Low maintenance: Replace bulbs once every 10–15 years instead of every 2–3 years. That’s fewer service calls, less disruption to your landscape, and less long-term cost.
Lower heat output: LEDs generate minimal heat compared to halogen. That means less risk to nearby plantings and less attraction for insects. (Heat draws bugs; cool LEDs don’t.)
The cost reality: Yes, LED systems cost more upfront than halogen. But they pay for themselves in 3–5 years through energy savings and eliminated bulb replacement costs. After that, you’re saving money every month for the next 10+ years.
Landscape Lighting for Evening Entertaining in Maryland
The whole point of landscape lighting is extending your outdoor space into evening hours — especially for entertaining. Here’s how to design lighting that makes your backyard the place everyone wants to gather after sunset.
Lighting Zones for Entertaining
Dining & Seating Areas: Use ambient lighting overhead (downlights from pergolas, trees, or structures). You want soft, warm illumination — not bright task lighting. This is mood lighting for conversation and relaxation. Accent lights on nearby plantings or water features add visual interest without being distracting. Dimmable systems let you adjust the mood from “dinner party” to “quiet conversation.”
Pathways & Transitions: Guide guests safely from the driveway or front door to the backyard. Light every step, grade change, and transition between spaces. Path lights should illuminate the ground, not shine in anyone’s eyes. This is functional safety lighting that doesn’t call attention to itself.
Focal Points & Conversation Pieces: Uplight specimen trees (Japanese maples, dogwoods, magnolias). Cross-light water features so moving water catches and reflects light. Accent garden beds or architectural features. These become natural conversation starters and add depth to the space.
Kitchen & Prep Areas: If you have an outdoor kitchen or grilling station, use task lighting for counters, prep surfaces, and cooking areas. This should be brighter than ambient lighting but still warm color temperature — not the harsh white light of a commercial kitchen. Focused downlighting works best.
Privacy & Perimeter: Subtle uplighting on privacy trees or screening plantings defines the space without harsh perimeter lighting. The goal is to keep the focus inward on your entertaining areas, not to light your entire property line like a security zone.
Maryland’s spring and fall advantage: Our perfect 60–70 degree evenings in April–May and September–October are ideal for outdoor entertaining. Landscape lighting extends the usable season by 6–8 weeks on either end. You’re not limited to the few summer months when it’s warm after dark — you can use your outdoor space from early spring through late fall.
I’ve designed lighting for countless properties in Harford and Baltimore County where the backyard becomes the primary entertaining space for half the year. That’s hundreds of hours of use that would be impossible without proper lighting.
Combining Landscape Lighting With Water Features & Trees (Oakfield’s Integrated Approach)
Lighting becomes truly magical when it’s designed alongside water features and specimen trees — not added as an afterthought years later. At Oakfield, we design all three services as a unified system, and the results speak for themselves.
Lighting + Water Features
Water and light together create something special. Moving water catches and reflects light in ways that no static landscape element can match.
Cross-lighting waterfalls and streams: Place fixtures to one or both sides of the water feature (not directly above or below). The light skims across the surface of moving water, creating shimmer and highlighting every ripple and splash. Top-down lighting flattens water features; side lighting brings them to life.
Uplighting ponds: Submersible fixtures or perimeter lights around a pond create subtle illumination and make the water surface glow. If you have fish, they become visible at night (koi especially look stunning under water with proper lighting).
Highlighting naturalistic features: Use lighting to emphasize rock texture, water flow patterns, and plantings around the water feature. The goal is to make the entire feature — not just the water — part of the evening landscape.
Sound + light: Moving water sounds better when you can see it. There’s something about watching and hearing water at the same time that creates a complete sensory experience. Lighting makes that possible after dark.
Because we design and install both water features and lighting at Oakfield, we plan the electrical and fixture placement during the initial build. Everything works together from day one.
Lighting + Trees
Trees are the most dramatic element you can light in a residential landscape. A mature specimen tree — oak, maple, dogwood, magnolia — becomes a sculptural focal point when properly lit.
Uplighting specimen trees: Place fixtures 6–8 feet from the trunk (not right at the base). Aim upward at a 30–45 degree angle to light the trunk, branching structure, and canopy. Distance creates even illumination; fixtures too close create harsh shadows and only light the trunk.
Texture matters: Oaks, sycamores, and river birch have deeply textured bark that looks stunning when uplit. Smooth-barked trees (beeches, some maples) create different effects — the light travels up the trunk more smoothly and emphasizes the form rather than texture.
Deciduous vs. evergreen: Deciduous trees create dramatic winter silhouettes when lit — all branching structure and no leaves. It’s actually when they look best. Evergreens (magnolias, hollies) provide consistent year-round visual interest but less seasonal drama.
Avoid trunk-hugging: Fixtures placed right against the trunk create weird shadows and only light a narrow column. Proper distance creates full, even illumination of the entire tree.
When Oakfield plants specimen trees as part of a landscape design, we’re already thinking about how they’ll be lit. We plant in locations that work for both daytime and evening viewing. We choose trees with interesting structure and bark texture. And when it’s time to add lighting (either immediately or years later), we already know exactly where fixtures should go.
Landscape Lighting Maintenance & Long-Term Performance
LED landscape lighting systems require minimal maintenance, but a few simple checks each year keep everything running perfectly for 10–15 years. Here’s what to expect.
Annual Maintenance Tasks
Clean fixtures: Wipe lenses to remove dirt, pollen, and debris. Clear away mulch or soil that’s settled around fixtures. This takes maybe 30 minutes once a year and makes a noticeable difference in light output.
Check alignment: Trees grow, ground settles, mulch shifts. Walk your property after dark and see if any fixtures have moved or need re-aiming. Usually just a few need tweaking.
Inspect wiring connections: Look for corrosion, loose connections, or exposed wiring (rare, but check after freeze/thaw cycles or if you’ve been digging in garden beds). Low-voltage systems are safe even if wiring is exposed, but it’s better to keep everything buried and protected.
Trim overgrown plantings: As plants mature, they can block fixtures or create unwanted shadows. A little pruning keeps sight lines clear.
Test transformer and timer: Make sure the system turns on and off as scheduled. Timers should be adjusted seasonally as sunset times shift.
LED Longevity
Professional LED fixtures last 30,000–50,000 hours. If you run your system 5 hours per night, that’s 10–15 years before bulbs need replacement. Compare that to halogen systems where you’re replacing bulbs every 2–3 years.
When LEDs do eventually need replacement, it’s usually all at once (they fade gradually rather than burning out suddenly). By that point, you’ve gotten 15 years of use. That’s exceptional longevity.
Seasonal Adjustments
Spring/Summer: Adjust for leafed-out trees and grown-in plantings. Fixtures that had clear sight lines in winter might need slight re-aiming once foliage fills in.
Fall/Winter: Re-aim for bare tree branches and winter structure. Deciduous trees look completely different without leaves, and lighting angles often need small tweaks.
Timer adjustments: Shift on/off times as sunset changes seasonally. In summer, you might set lights to turn on at 8:30pm and off at 11pm. In winter, adjust to 5pm on and 10pm off.
Why Choose Oakfield Landscaping for Your Landscape Lighting Design in Harford County
Oakfield designs landscape lighting as part of a complete outdoor environment — not as a standalone service tacked onto someone else’s work. Because we design water features, install specimen trees, and create the plantings, our lighting systems enhance everything we’ve already built.
What Makes Oakfield Different
Design-Build Approach: A single team handles design, installation, and long-term care. No handoff between separate lighting contractor and landscaper. No coordination headaches. Eric and his crew do it all.
Lighting is planned during the initial landscape design phase, not retrofitted years later. Wiring routes are established before hardscape goes in. Fixture placement is coordinated with tree planting and garden bed layout. Everything works together from day one.
Integrated Systems: Water features, tree plantings, and lighting are designed as a unified system. Fixtures are hidden in planting beds, behind natural features, integrated into rockwork around water features. The lighting enhances the overall landscape design intent — it doesn’t fight against it.
When we uplight a specimen oak in your front yard, we planted that oak. We know its growth pattern, branching structure, and how it’ll look in five years. That knowledge informs fixture placement and beam angle selection.
Maryland Expertise: Deep knowledge of local climate, seasonal changes, and native trees. We design systems that account for deciduous trees in winter, humid summers, freeze/thaw cycles, and Maryland’s growing zone (6b/7a).
We know which trees light well (oaks, dogwoods, Japanese maples, river birch) and which don’t. We understand how Maryland’s spring and fall outdoor entertaining seasons drive lighting use patterns. We’ve worked on hundreds of properties across Harford and Baltimore County — we know what works here.
LED Quality: We only use professional-grade LED fixtures with warm color temperature (2700K–3000K). Brass, copper, and stainless steel materials resist corrosion and last decades. Low-voltage systems (12V) are safe, energy-efficient, and easy to adjust or expand in the future.
That personal touch shows in our 60+ five-star Google reviews. Clients mention Eric by name, talk about his attention to detail, and recommend Oakfield to their neighbors. That reputation matters in a community like Harford County.
Service Area: We serve Harford County and Baltimore County — including Bel Air, Abingdon, Aberdeen, and surrounding areas. We’re local, we know the area, and we’re invested in the community.
When you call Oakfield for landscape lighting design, you’re getting a team that understands Maryland properties, values long-term relationships, and designs lighting as part of a complete outdoor environment — not just a list of fixtures installed in the ground.
Ready to Extend Your Outdoor Space Into Evening Hours?
If you’re ready to transform your beautifully landscaped property into a space you can actually enjoy after sunset, let’s talk about landscape lighting design.
Next Steps
1. Call or email: (443) 794-8108 or eric@oakfieldlandscaping.com
2. Schedule a consultation: We’ll walk your property (ideally at dusk) and discuss what you want to highlight, how you use the space, and what features deserve accent lighting.